
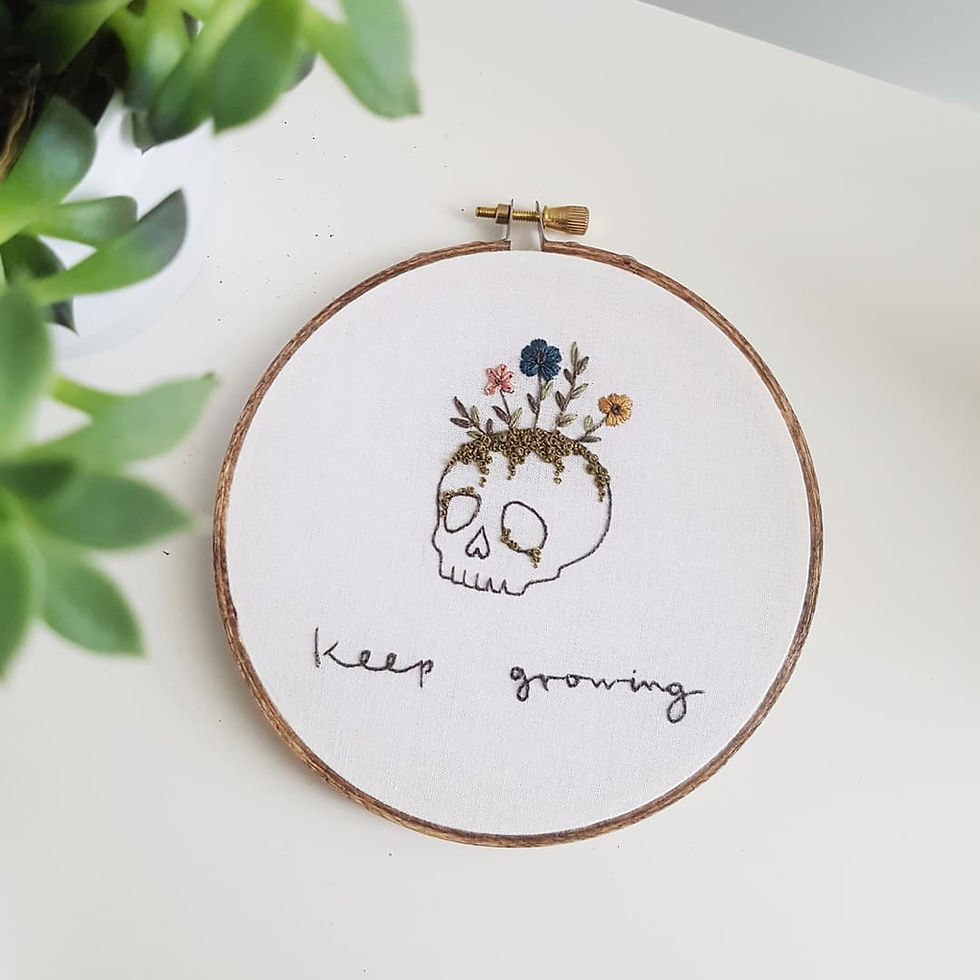
the secret to stained hoops
- laura gushue
- Oct 25, 2021
- 3 min read
I've always loved dark stained wood over the lighter natural look. Darker cabinets, floors and tables are my jam. I think the simple detail of stain can add a sense of elegance and make everything look just a little bit more classy.

So no surprise that I'm the same when it comes to embroidery. I remember when I discovered this method, I couldn't believe what an impact the dark stain had on the overall look of the finished piece. If you're a fan of dark stain and the dramatic impact it can have on your work, give this easy stain method a try!
While I do use regular liquid stain from a can for bulk staining, the secret to easy stained hoops is a stain marker. If you don't know what that is, they're typically used for touching up the colour on scuffed furniture or floors. They're definitely not a well known embroidery tool!
You can find these in Wal-Mart or most hardware stores, usually for around $15.00 CAD. My favourite brand is Varathane, but I've only tried a few others. They are relatively clean and easy to use, and they dry very quickly which is a huge bonus. I leave regular liquid stain to dry for at least 24 hours whereas the stain marker needs about 15-20 minutes.
I've made a little tutorial below as to how I go about using a stain marker. There's also a video available on my Instagram (@through.rain.or.shine).
Using a stain marker
Before staining always protect your surface and your skin. These markers will stain just like the name suggests. I like to put down cardboard where I will be staining and wear plastic gloves. It's also best if possible to do this in a well ventilated area.


First, remove the screw and inner hoop. If this is the first time using your marker, you will likely have to shake the marker and press down the tip a few times to get the stain flowing. Always check the packaging to see what your brand suggests! When staining, you want enough stain that it spreads easily but isn't dripping or pooling.
Start by staining around the hardware at the top of the hoop. Use the small part of the chisel tip to get into the tighter spaces. If you get some stain on the hardware, just wipe it away with a clean bit of your glove or a q-tip.


Once the tricky part is done, stain the front and back edges of the hoop, and finally the outer edge. Staining in this order will give you the least amount of smudging.


You can add the inner hoop and screw almost immediately after staining, but I recommend waiting at least 15 minutes before adding fabric to the hoop. You can test how dry the stain is by wiping a scrap of fabric against it. Once it comes away clean, you're good to go!
If you're staining in bulk or can't get access to a stain marker, this is essentially the same method I use with regular stain as well, but with a flat edge paint brush (that will be ruined!). The markers are just so convenient for a once in a while use.
I hope this was useful for those of you wondering where I get my lovely stained hoops. My favourite stain colour right now is chocolate (or maybe I just love chocolate?). AND if this is still way too much effort for you? You can buy pre-stained hoops here in my shop!

My name is Laura and I'm so glad that you're here to learn about my favourite craft! I hope you learned something new. If you'd like to request a topic or technique for me to go over in a post, please let me know! You can email me at laura@throughrainorshine.ca.Happy Stitching!! Want to stay informed on blog posts, tutorials, and information? Sign up as a member to be notified about new posts!


Comments